How to Connect to cPanel via SSH Using PuTTY
Need shell access to your hosting account from Windows? This step by step guide shows how to connect to cPanel via SSH using PuTTY, including checking SSH access, creating an SSH key, importing and authorising the public key in cPanel, configuring PuTTY and running your first commands. The screenshots use example values and highlighted click areas so each step is easier to follow.
What you need
- cPanel login details
- SSH-enabled hosting account
- Server hostname or IP
- SSH port, usually 22
Best login method
SSH key login is usually the best option. PuTTY uses a .ppk private key, while cPanel stores the matching public key on the server.
Know these first
Before you start, make sure you know your cPanel username, the server hostname, the SSH port and whether password login or key login is allowed.
Screenshots below use the approved callouts where helpful, with the written steps explaining exactly which button or field to use.
What is PuTTY and what does “connect to cPanel via SSH” mean?
PuTTY is a free SSH client for Windows. It opens a secure terminal session to your hosting account or server, allowing you to run Linux commands from your PC.
When people say they want to connect to cPanel via SSH, they usually mean they want to log in to the hosting account behind cPanel using their cPanel username plus either a password or an SSH key. It is not the same as logging into cPanel in your browser. cPanel is the control panel. SSH is the command line doorway behind it.
Common reasons to use SSH: checking logs, fixing file permissions, using WP-CLI, running Git, inspecting files, searching with grep, finding large files, or troubleshooting website problems faster than clicking through menus like a very polite woodpecker.
Download PuTTY safely
Download PuTTY from the official PuTTY download page:
Download PuTTY from the official site
For most Windows users, the easiest option is the Windows installer package. It usually includes:
- PuTTY, the SSH client used to connect to your hosting account.
- PuTTYgen, the key generator used to create PuTTY SSH keys.
- Pageant, an SSH agent that can hold your key while you work.
- PSCP/PSFTP, command line tools for file transfer over SSH.
Tip: avoid random third-party download sites. Use the official PuTTY page where possible.
Check that SSH access is available
SSH access must be enabled
Some hosting plans allow shell access by default. Others require you to enable it in cPanel or ask your hosting provider to enable it.
You need the hostname or IP
Use the server hostname, server IP, or SSH hostname supplied by your host.
You need the SSH port
The standard SSH port is 22, but some providers use a custom port.
You need a login method
This may be password login, SSH key login, or both depending on your host.
Where SSH Access appears in cPanel
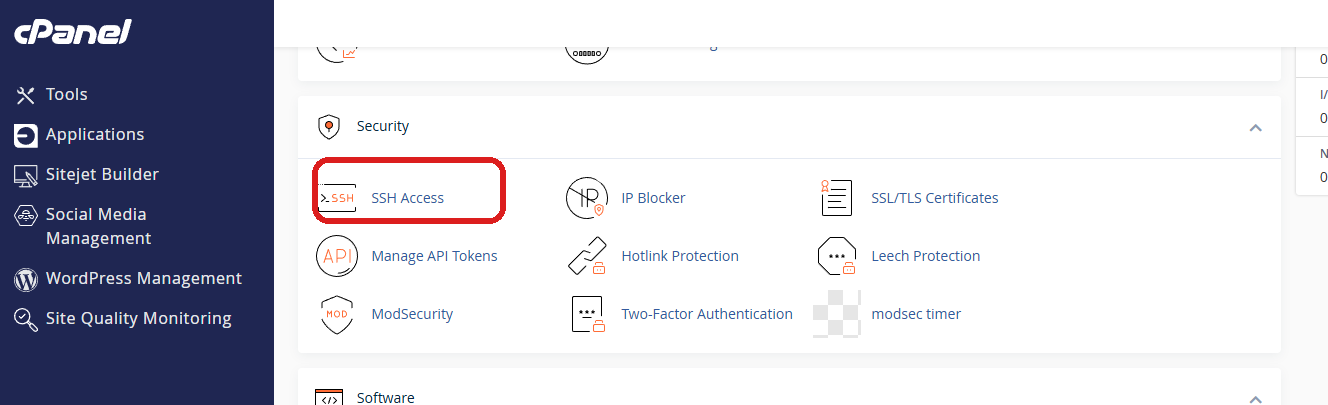
If you do not see SSH Access in cPanel, shell access may not be enabled for your hosting account yet. In that case, ask your hosting provider whether SSH is available and which hostname, username and port you should use.
Step by step overview
Download PuTTY and PuTTYgen
Install PuTTY from the official site so you have both the SSH client and PuTTYgen.
Open cPanel and find SSH Access
Check that SSH is available for the hosting account and note the hostname, username and port.
Create an SSH key in PuTTYgen
Generate an Ed25519 key if possible, or RSA 4096 if your host requires RSA.
Import and authorise the public key in cPanel
Paste the public key into cPanel, then authorise it so the server can accept your login.
Load the private key in PuTTY
Enter the hostname and port in PuTTY, then browse to your .ppk private key if you are using key login.
Log in and test a few safe commands
Use your cPanel username to connect, then run simple commands like pwd and ls -la.
Password login or SSH key login?
There are two common ways to log in with PuTTY:
| Method | What it means | When to use it |
|---|---|---|
| Password login | You enter your cPanel username and password in PuTTY. | Useful for quick access if your host allows password authentication. |
| SSH key login | You generate a public/private key pair, authorise the public key in cPanel, and load the private key in PuTTY. | More secure and often required by hosts that disable password SSH login. |
If password login works for your host, you can skip the key generation sections. If your host requires SSH keys, follow the next two sections carefully.
Generate an SSH key using PuTTYgen
PuTTY uses its own private key format, normally saved as a .ppk file. You can create this with PuTTYgen, which is included with the Windows PuTTY installer.
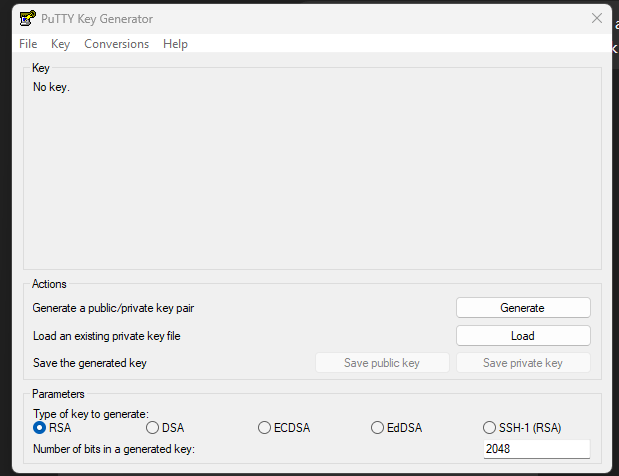
Recommended key type
If your version of PuTTYgen supports it, choose EdDSA with Ed25519. This is modern and widely used. If your hosting provider specifically asks for RSA, choose RSA with at least 4096 bits.
Steps to generate the key
- Open PuTTYgen.
- Select EdDSA if available, or RSA with
4096bits if RSA is required. - Click Generate.
- Move your mouse around the blank area while the key is generated.
- Add a strong key passphrase.
- Click Save private key and save the file somewhere safe, for example
Documents\SSH Keys\cpanel-key.ppk. - Copy the public key text from the box labelled Public key for pasting into OpenSSH authorized_keys file. You will need that in cPanel.
Important: keep the private key private. Do not upload the .ppk private key into random support tickets, chat windows or pastebins. The public key is the part that goes into cPanel.
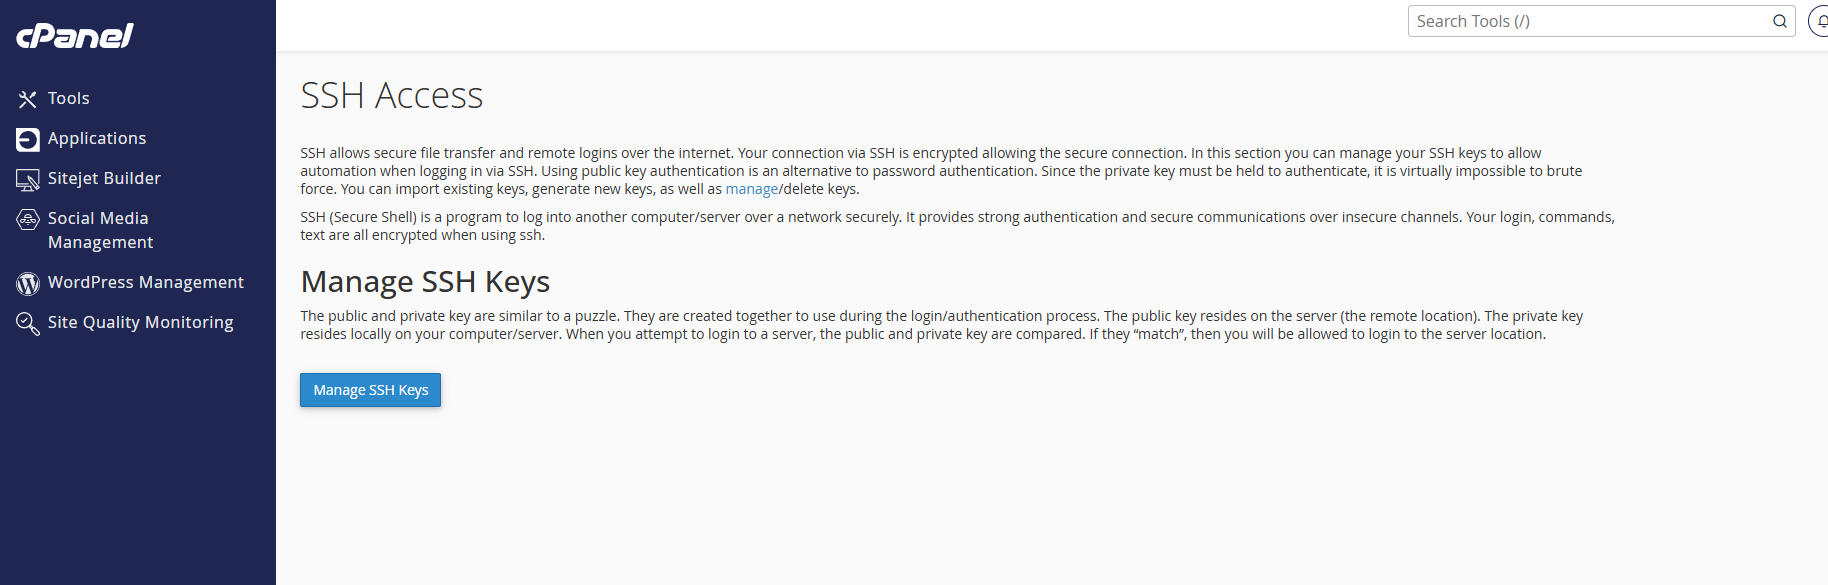
Import and authorise the key in cPanel
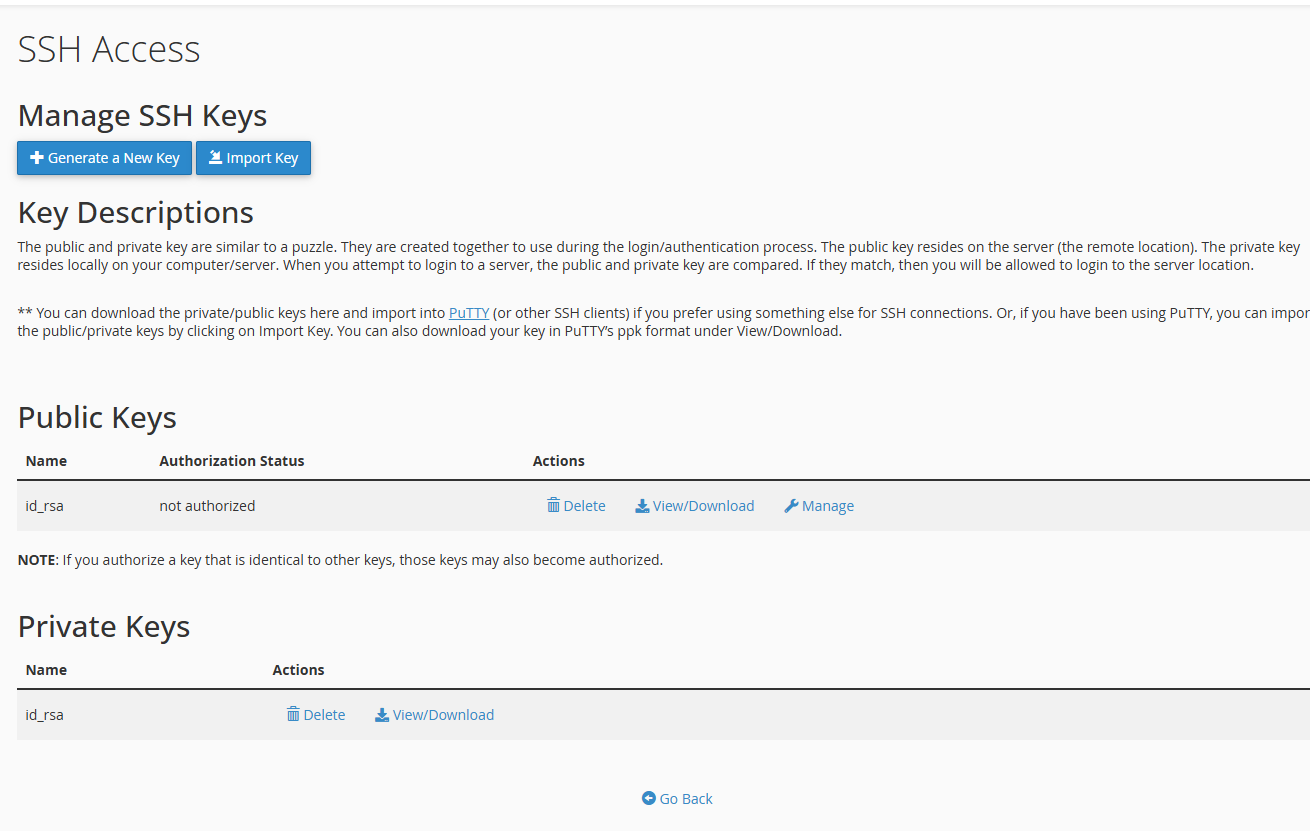
In cPanel, open SSH Access and click Manage SSH Keys.
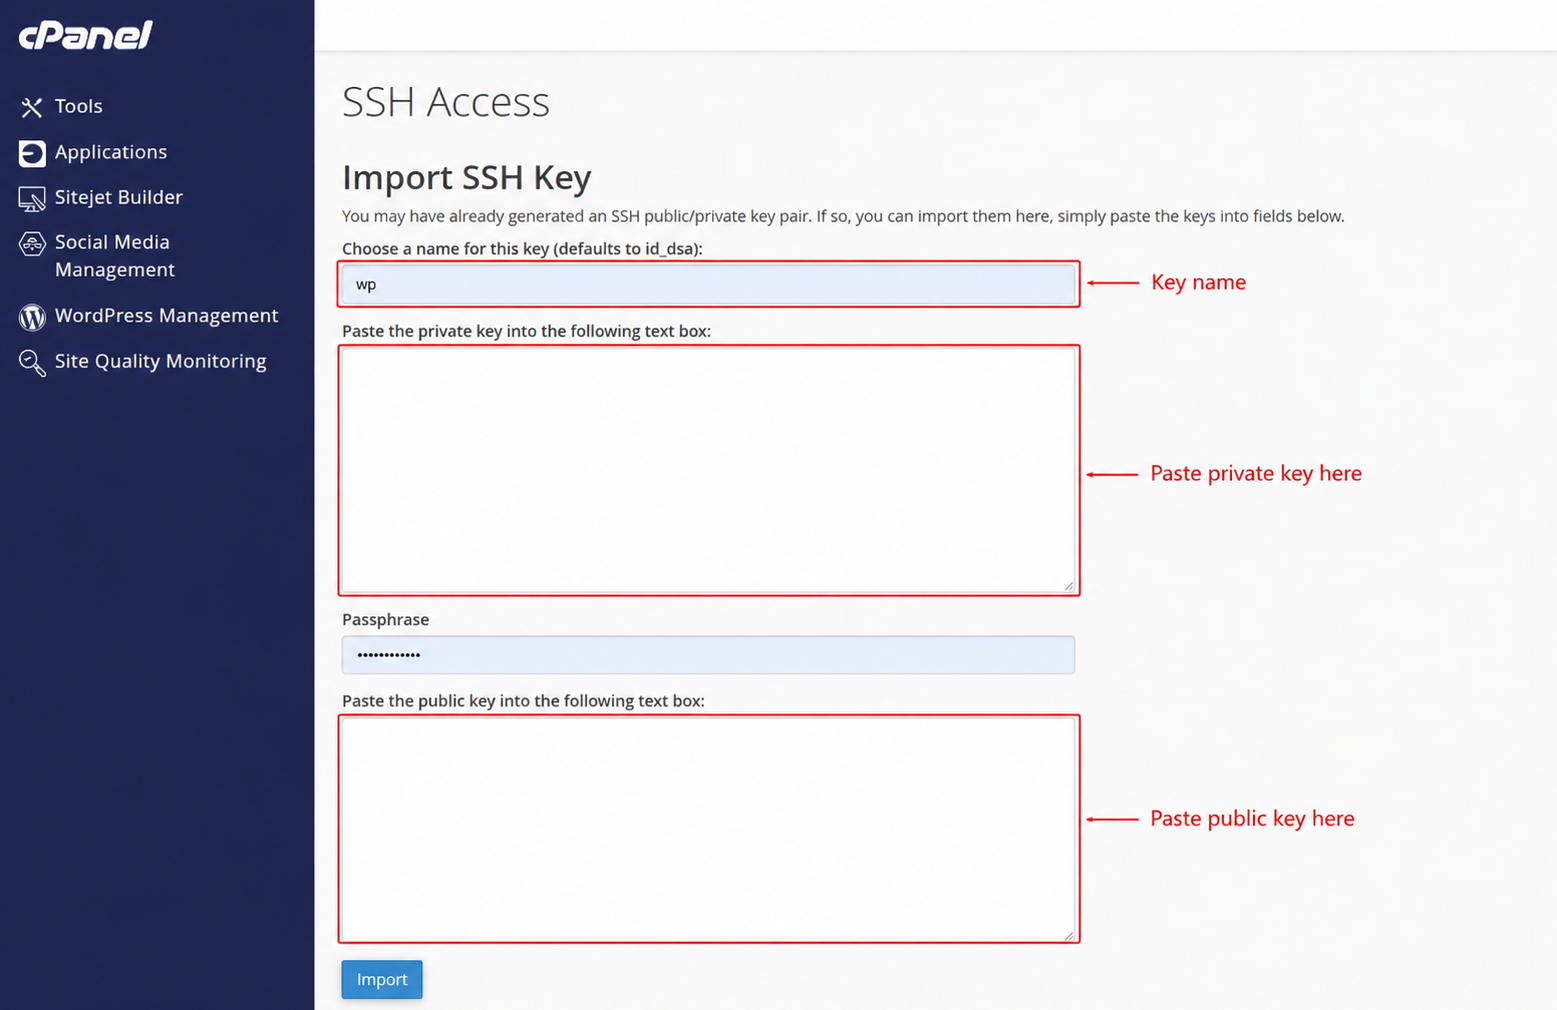
4A. Import the public key from PuTTYgen
If you generated the key using PuTTYgen, click Import Key in cPanel. In most cases you will import the public key only and keep the private key on your own computer.
- Enter a simple key name such as
id_rsaorcpanel-key. - Leave the private key box empty unless you have a specific reason to store the private key in cPanel.
- Paste the public key from PuTTYgen into the public key box.
- Click Import.
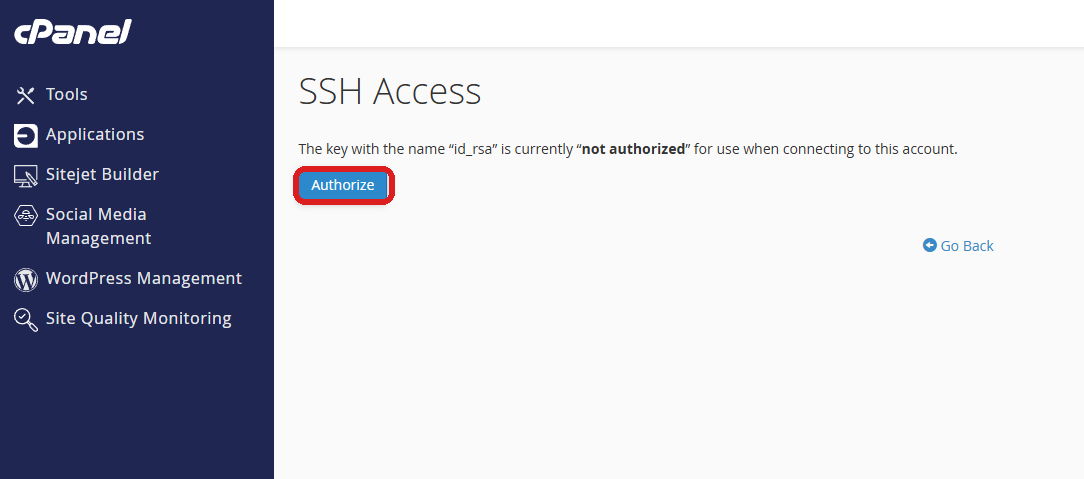
4B. Authorise the imported key before using PuTTY
Importing the key is not always the final step. In many cPanel setups, the key first appears in the Public Keys list with the status not authorized. You then need to click Manage on that key row and authorise it.
- Go back to Manage SSH Keys.
- Find your imported public key in the Public Keys section.
- Check the Authorization Status. If it says not authorized, click Manage.
- On the next screen, click Authorize.
- Return to the key list and confirm the public key now shows as authorised.
4C. Generate the key inside cPanel
cPanel can also generate a public/private key pair. If you do this, download the private key afterwards and convert it to PuTTY's .ppk format in PuTTYgen using Conversions > Import key, then save it as a private key.
The private key stays on your computer. The public key is stored on the server. During login, PuTTY proves that your private key matches the authorised public key. If the key is imported but not authorised, PuTTY will usually reject the login even though the key appears in cPanel. This is the step most people miss.
Connect with PuTTY
5A. Connect with a password
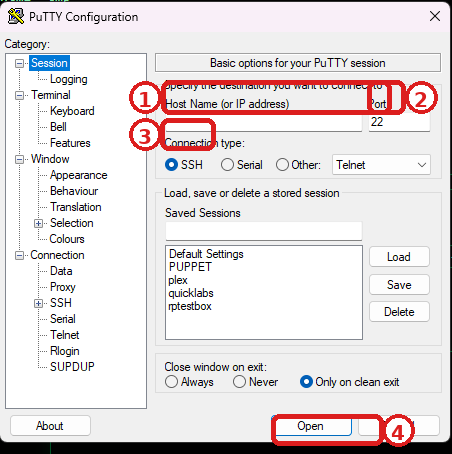
If your host allows password login, open PuTTY and work through these fields in order:
- Host Name: your server hostname or IP address
- Port: usually
22 - Connection type: SSH
Example PuTTY values: Host Name: server.example.com, Port: 22, Connection type: SSH. Replace the hostname with the value from your hosting provider.
5B. Connect with an SSH key
If you are using an SSH key, load your .ppk private key in PuTTY before opening the connection. If your key was generated in cPanel instead, convert it to .ppk in PuTTYgen first.
- Open PuTTY.
- Enter the hostname and port under Session.
- Go to Connection > SSH > Auth.
- Browse to your saved
.ppkprivate key file. - Go back to Session, optionally save the session, then click Open.
Example key path: C:\Users\You\Documents\SSH Keys\cpanel-key.ppk. Your file path will be wherever you saved the private key from PuTTYgen.
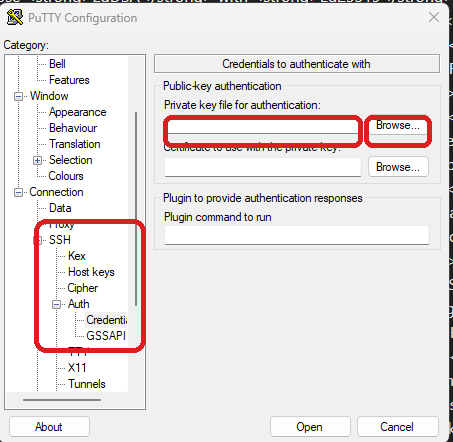
.ppk private key under Connection > SSH > Auth.5C. Accept the host key on first connection
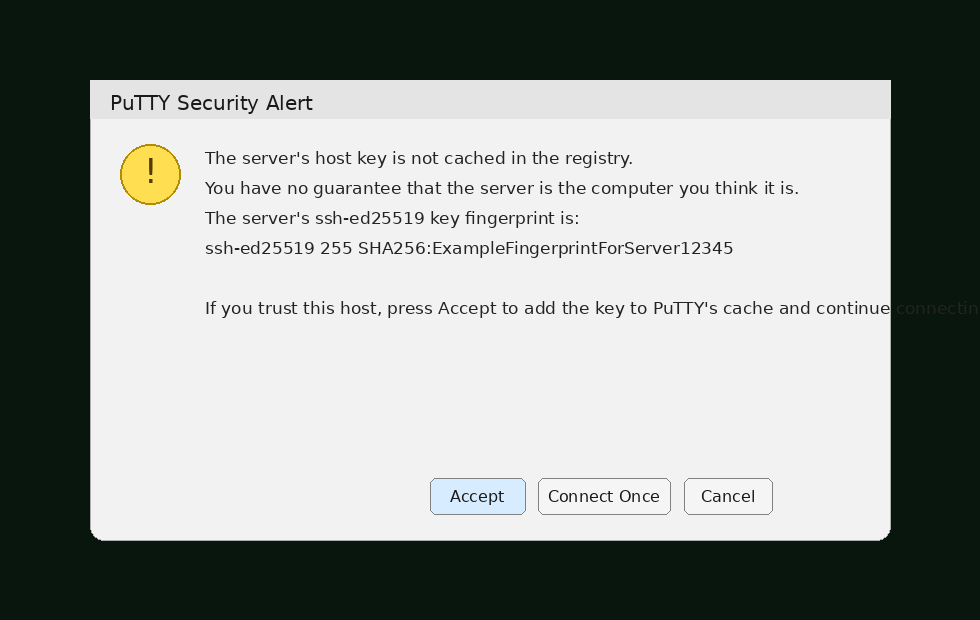
On the first connection, PuTTY normally displays a host key warning. If the hostname is correct and you trust the server, click Accept.
5D. Log in with your cPanel username
PuTTY will ask for your username. This is usually your cPanel account username, not your email address or the name of your website. If using password login, type your password when prompted. The password will not appear on screen while you type.
login as: exampleuser
exampleuser@server.example.com's password: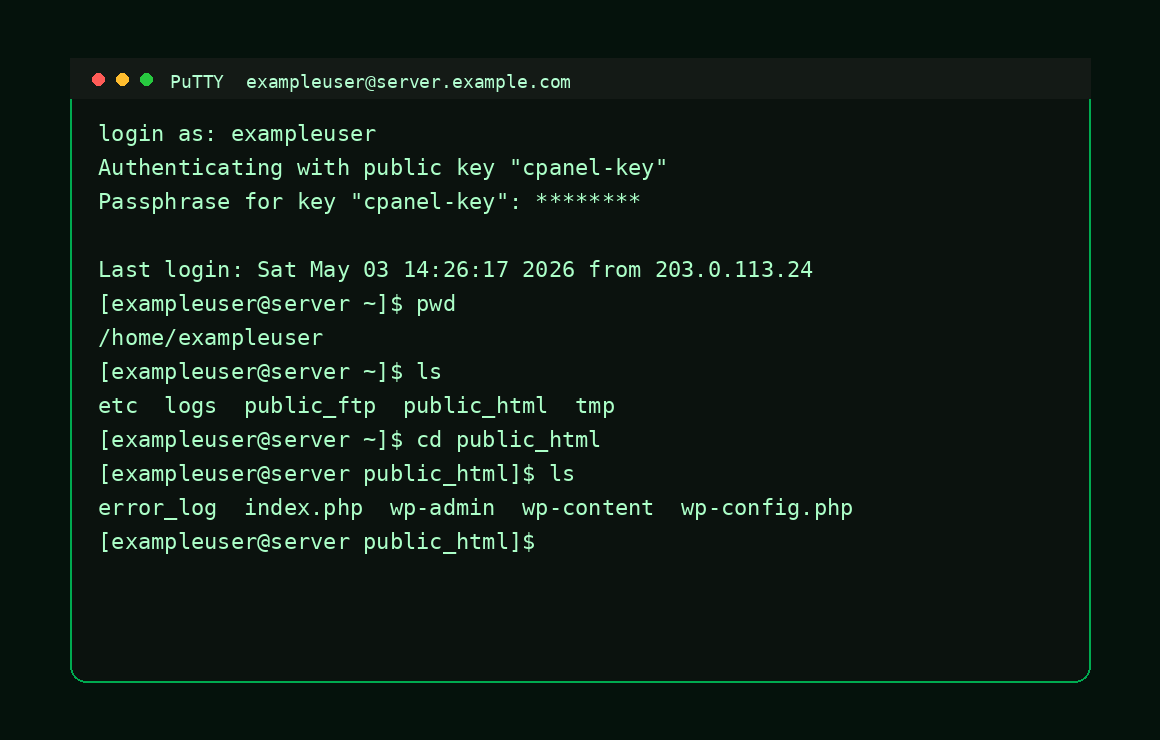
Run your first commands after connecting
Once the login succeeds, you are in. Start with a few safe, read-only commands so you can confirm you are in the right place and see what is available on the account.
pwd
ls -la
cd public_html
ls -la
tail -20 error_log
Example output
[exampleuser@server ~]$ pwd
/home/exampleuser

[exampleuser@server ~]$ ls
etc  mail  public_ftp  public_html  tmp

[exampleuser@server ~]$ cd public_html
[exampleuser@server public_html]$ ls
index.php  wp-config.php  wp-content  error_log

[exampleuser@server public_html]$ tail -3 error_log
[03-May-2026 09:34:08 UTC] PHP Warning: Example warning
[03-May-2026 09:34:09 UTC] PHP Notice: Example notice
[03-May-2026 09:34:10 UTC] PHP Fatal error: Example fatal error
Check where you are
pwd prints your current directory.
List files
ls -la shows files, folders, hidden files and permissions.
Read recent log lines
tail -20 error_log shows the latest entries in a local error log.
Exit safely
exit closes the SSH session.
Common PuTTY SSH problems and fixes
| Error or issue | What it usually means | What to check |
|---|---|---|
| Network error: Connection timed out | PuTTY cannot reach the server. | Check hostname, IP, SSH port, firewall and whether the server is online. |
| Connection refused | The server is reachable but SSH is not accepting connections. | Confirm SSH access is enabled and that the SSH service is listening on the expected port. |
| Access denied | Your login details or key were rejected. | Check username, password, authorised public key and selected private key. |
| Server's host key changed | The saved fingerprint does not match. | Verify with your host before accepting. This can happen after server rebuilds or migrations. |
| PuTTY asks for key passphrase repeatedly | The private key is encrypted or the wrong key is selected. | Check the .ppk file and passphrase, or reselect the key under SSH Auth. |
| Password appears not to type | Normal SSH behaviour. | Keep typing carefully and press Enter. SSH hides password input on purpose. |
If you can log in to cPanel in your browser but not through PuTTY, the most common causes are SSH access not enabled, the wrong hostname or port, the wrong username, or a key that has been imported but not authorised.
Security tips when using PuTTY with cPanel SSH
- Download PuTTY from the official PuTTY site.
- Use SSH keys where possible.
- Protect your private key with a strong passphrase.
- Keep your
.ppkprivate key private. - Remove old authorised keys from cPanel when they are no longer needed.
- Verify changed host key warnings with your provider before accepting.
- Be careful with destructive commands such as
rm,chmodandchown. - Log out with
exitwhen finished.
If you are going to change ownership or permissions after connecting, read the Linux permissions guide and test combinations with the Permissions Builder first.
Suggested improvement: if you want this guide to help more beginners, consider adding a tiny section later on for Where do I find my server hostname in cPanel? and another for How to connect with a password if SSH keys are not enabled yet. They are common follow-up questions.
Frequently asked questions
Where do I download PuTTY?
Use the official PuTTY download page: https://www.chiark.greenend.org.uk/~sgtatham/putty/latest.html.
Do I need PuTTYgen as well as PuTTY?
You need PuTTYgen if you want to generate an SSH key pair or convert a private key into PuTTY's .ppk format.
What hostname should I use in PuTTY for cPanel SSH?
Use the server hostname, account server name, or IP address supplied by your host. The server hostname is usually the safest choice.
What port should I use in PuTTY?
Usually 22. If your host uses a custom SSH port, use the value they provided instead.
Is the SSH username the same as the cPanel username?
Very often, yes. On many cPanel hosting accounts, the SSH username is the same as the cPanel account username.
Do I paste the private key into cPanel?
Usually, no. If you created the key in PuTTYgen, the normal setup is to keep the private key on your own computer and only import the public key into cPanel.
Why does PuTTY not show my password while typing?
SSH hides password input on purpose. It can look like nothing is happening, but the characters are still being entered.
Can I connect to cPanel via SSH from Windows without PuTTY?
Yes. Windows also supports SSH in PowerShell and Windows Terminal. PuTTY remains popular because it gives beginners a simple graphical connection manager.
Common PuTTY SSH connection errors
| Error | Likely cause | What to check |
|---|---|---|
| Connection timed out | Firewall, wrong hostname or closed port | Hostname, SSH port and IP allow rules. |
| Connection refused | SSH service not listening on that port | Correct port and whether SSH is running. |
| Access denied | Wrong username, password or key | cPanel username, key format and authentication method. |
| Server unexpectedly closed connection | Policy, shell access disabled or server-side restriction | Whether SSH access is enabled for the account. |
Frequently Asked Questions
What hostname should I use for cPanel SSH?
Use the server hostname or the domain if it resolves to the hosting server.
What port does SSH use?
The default SSH port is 22, but hosting providers may use a custom port.
Why does PuTTY say access denied?
Common causes include the wrong username, wrong password, disabled shell access or an SSH key problem.
Can I use SSH keys with PuTTY?
Yes. PuTTY can use private keys, usually in PPK format.